What Steps Should Be Followed For GL.iNet Router Setup?
GL iNet is performing exceptionally well in the networking game with its high quality, affordable and feature rich routers. So if you also got one for your abode or office space then you must definitely be on a hunt for an easy to understand and straightforward GL iNet setup guide. If the case is so then this blog post is all about that only. Here you’ll get complete setup details from proper right placement to installation. So with no extra delay, let’s unveil the setup guide.
Start By Collecting Setup Components
We’ll simplify the whole GL iNet setup guide in this post. So the first step is the collection of setup components. Here’s everything that you need:
- GL iNet router
- Power adapter
- Access to power socket
- Ethernet cable
- A smart device
- An internet source
Users who have tried doing the installation but the outcome didn’t turn out to be favourable then you first need to do factory reset on the router and only then proceed with the further steps.
Next Step Is Strategic Placement Of Router
No matter how to the point you follow the GL iNet setup guide if the placement of the router is not correct the final outcome will not be desirable. So here are the right strategies that you must consider for proper working of the router.
First of all, always keep the networking device in an open area where ventilation is proper. Ideally, the placement should be done where you operate most of your devices or in the middle of your abode. Do not plot the router behind any object like curtains, walls or furniture. Additionally, there are few metal and electrical objects that can interfere with the router’s signals. To name a few these are microwave, cordless phones, fish tanks, ceiling fans, refrigerator, baby monitors, CCTV cameras, aluminium doors as well as bluetooth devices. So ensure there is no closeness between these objects and your GL iNet router.
If you want best coverage, then you should keep the router on high elevations. Finally, after placement you can follow the installation guide.
GL iNet Setup Guide
The installation steps are simple and can be understood easily even by a non-tech individual. So here’s the complete guidance:
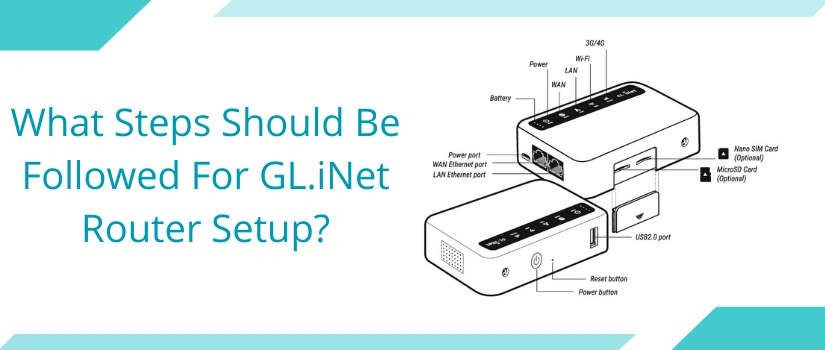
- First power on the router. Use the given power cord only because otherwise the device malfunction can occur.
- Remember that you cannot move to the next step of GL iNet setup guide unless you get an indication from the router itself. The indication is proper solid power light.
- Now take up your smart device. It can be your cellphone, laptop, computer or any other wifi enabled gadget like iPad.
- Thereafter, from the base panel of your router note down the wireless keys. Now turn on the wifi of your device. Use these collected details for establishment of wireless connection in between your router and the smart device.
- If you want to skip the above step, then you can because we do have an alternative for it. The alternative is to establish a link directly via ethernet wire.
- Now in this step of GL iNet setup guide, you need to open up a browser. Make sure it doesn’t have available updates and it must also be compatible. Need recommendations for browsers? If yes then you can consider internet explorer, chrome, firefox, safari and edge.
- Moving further, go to the address column of the browser. Type in http://192.168.8.1. Click the Enter key.
- Now the GL iNet setup guide is almost about to complete. So now you have to select the language. Click on Next. Create a passkey. Confirm the same and click on Login.
- With this you now get accessibility to the setup panel. All you need to do is, click on the Internet option. Choose any one connection mode and then go through the directions that appear on the interface itself.