GL S200 Setup
GL S200 is a thread border router. It is specifically designed for the users who want to host and manage low power and reliable IoT mesh networks. Basically a thread router that is GL S200 can easily transfer information between a thread network and a non thread network. The GL S200 setup supports BLE (Bluetooth low energy) in addition to Thread protocols. To get complete insights about this magical product from GL.iNet, you need to read the complete guide.
Key Features Of GL S200 Setup
The Thread protocol works greatly under high density networks. As it reduces network congestion. Whereas the BLE protocol allows the users to connect to distant devices. Moreover with GL S200 setup, users get both device to device connectivity and also device to cloud connectivity.
Coming to the security which is a major concern for all the users, GL S200 comes with AES encryption and phone authentication. Further for ensuring complete network security, it runs on end-to-end encryption. Thereafter it is built on a power efficient IEEE 802.15.4 MAC/PHY. With IPv6 you get to communicate with multiple devices.
GL S200 setup supports DNS over TLS and also DNS over HTTPS. The first one uses encryption to secure DNS communication whereas the second one adds an extra layer of security.
Moreover the GL S200 thread border router comes with pre-installed OpenVPN and WireGuard. Lastly, with the GoodCloud platform users can easily manage, control and access the web admin panel remotely.

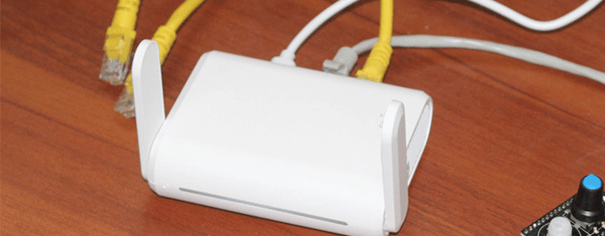
Hardware Overview Of GL S200
The GL S200 has two retractable antennas. On the side panel there is a toggle button and a reset button. Whereas on the back panel of S200 there is a WAN port, a LAN port and a power port. On the front panel there is a smart LED light indicator.
Here is the list of package contents:
- Firstly, there is an GL S200 thread border router.
- Next, a power adapter with a converter based on the shipping address.
- Thirdly, users get an Ethernet cable.
- Lastly, there is a quick user guide with a warranty card.
For GL S200 setup, all these package contents are very important. But these are not the only requirements, as users also need a smart device, a power socket and modem with an active internet plan.
Installation Steps
The GL S200 setup is quite straightforward and easy to perform. Users do not need any tech degree for setting it up.
Power It On
In every setup process, the first step requires the user to turn on the device. Therefore, take the power adapter, slip its power pin into the power port of GL S200. Now plug in the adapter into a vacant and properly working power socket. Turn on the switch. Check the front panel of the thread border router, you’ll see a solid blue light. Now our mission is to turn this light into solid white. As this indicates a successful GL S200 setup.
Connect To GL S200
For connecting, there are two options. We recommend using the first option which is ethernet based, as it is hassle-free and more reliable then the wireless connection.
- Use the ethernet cable to connect your smart device to the LAN port of GL S200.
- For wireless connection, toggle the wifi of your smart device. A list appears on the screen. Select GL S20 or a name something similar to it. Now move the thread border router upside down and check out the default password. Fill up the same password to connect the smart device to the GL S200 setup.
Access Web Admin Panel
After that open any internet browser. But be sure that the browser is not corrupt. Now move towards the URL bar or address bar as you may call it. In it fill http://192.168.8.1. Thereafter hit enter.
Now select the language that you are comfortable in and hit Next. It’s time to create an admin password. Use a strong password and hit Submit. Finally you have access to the web admin panel. Now all you need to do is select any option from the side bar and start following the on-screen instructions for completing the GL S200 setup.
For connecting to the internet you get to choose between four different options. One is using ethernet cable, secondly, by using existing wifi, next via USB tethering and lastly through USB modem.
As you see a solid white light on the front panel, you can rest easy knowing the router is working well.
Resetting GL S200
Did you mess up the whole GL S200 setup process, or do you simply want to reset the router to its factory default settings? Whatever may be the case, you need not worry, just follow these simple steps:
Firstly, make sure the thread border S200 router is on. Now disconnect your devices from the S200’s network. Thereafter softly press the reset button from the side panel. Do not release it, rather hold it for at least 5 to 8 seconds. Now upon releasing the router will return to its original condition.
The reset erases all the data, so be mindful before you take this action.
For any query, issues or for assistance with the GL S200 setup, feel free to connect with the experts.