How To Program GL iNet Router ?
GL iNet offers a vast variety of routers. You get options for everything be it home, office or travel. So did you also get your hands on one of the GL iNet routers? If yes, first you made a great choice and secondly it’s not at all difficult to conduct the GL iNet router setup process. Rather the steps are quite easy and you can be online within a couple of minutes. Learning about the GL iNet setup process won’t take up much time and neither do you require the expert assistance. You just need step by step guidance, which this blog post is going to help you with. So with no delays, let’s get started.
✓ Place The Extender At Right Location
First of all unbox the GL iNet setup box and take out all the components like the router, power adapter, ethernet wire and the quick user guide.
Now pick up the router and take it to the center of your place. Make sure the surroundings don’t have too many thick concrete walls, electrical and metal items like fish tank, CCTV camera, refrigerator, microwave, baby monitor, cordless phone or bluetooth devices. Also do not keep the router inside a box or in the corner. Just choose an elevated, open and central place for the router.
✓ Power On
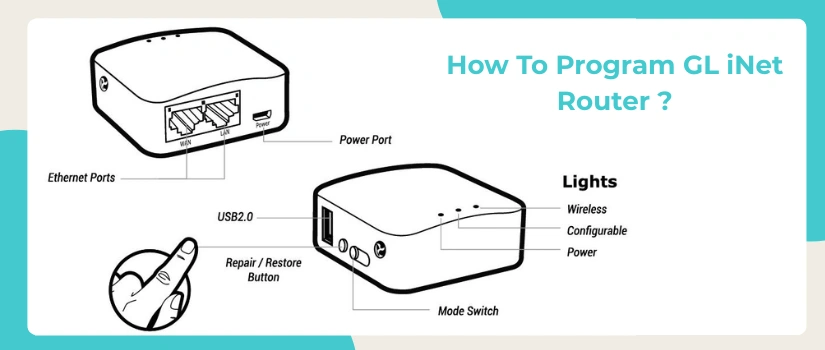
Now after the placement is done, grab the power adapter. Move its power pin into the router’s power port. Then plug the adapter into the electrical wall outlet. Press down the power button. Now the status indicator will flicker, so you need to wait till it stables down.
✓ Pair With Smart Device
For further GL iNet setup you need a smart device. You can use any device from laptop, iPad, computer system to a smart phone. Now the task is that you have to establish a connection between the smart device and the GL iNet router. Choose between two options for the same:
- For establishing a direct and stable connection you can use the ethernet wire.
- For a wireless connection, you first have to enable your smartdevice’s wifi. Then on the base panel you’ll find the default SSID, connect to it using password “goodlife”.
✓ Log In
Now for a successful GL iNet setup, login is the most crucial step. So on your networked device, open an internet browser like chrome, firefox. Then take the cursor to the URL blank. Into it you have to type 192.168.8.1 and hit enter. With this a window will open up asking you to select the language. Pick the same and click on Next.
Now there is no pre-assigned password, so you get a chance to create one of your own. The password must contain not less than 5 characters. So type the same and then click on Submit. With this you have successfully logged into the main GL iNet setup page.
✓ Link To The Internet
Finally to connect to the Internet, you have to pick the option of Internet from the side bar. As you click on it, you’ll get various options like repeater, tethering, cellular and Ethernet. Select any one option. Thereafter fill in the asked details and adhere to the on-screen instructions that the interface shows. With this you’ll be able to connect to the Internet successfully.
If the GL iNet setup outcome didn’t turn out to be as expected or you need other tech assistance, then do not hesitate to call, chat or write to our experts.